myWerkzeug.de › CNC.myWerkzeug.de › Templates › Technology and experiments
CNC template · Technology and experiments
Circuit board for school
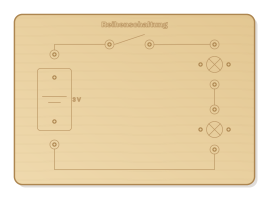
Learning board for simple 3 V circuits: engraved circuit diagram, holes for brass paper fasteners as terminals, a paper clip as switch, lamp holder and battery holder. As series or parallel circuit.
- Size
- 256 × 186 mm, 6 mm thick
- Material
- Plywood
- Difficulty
- Beginner
- Milling time
- approx. 10 min
- Bits
- V-bit 60°, End mill Ø 2 mm, End mill Ø 3.175 mm
- Customise
- Size, text and details adjustable with sliders
- With a laser
- diode laser from about 10 W (cuts 6 mm)
Try it without an account · carve with Chrome or Edge · no installation
Build instructions
Materials and accessories
| Qty | Part |
|---|---|
| 1 | Brass paper fasteners, paper clip, stranded wire, E10 holders with 3.5 V bulbs, battery holder 2 × AA |
Also: sandpaper (grit 120 and 240), a utility knife or fine saw and, for joints, a rubber mallet.
Carving and finishing
- Clamp the workpiece flat on the spoilboard or secure it with double-sided tape, and set the origin as shown in the carving assistant.
- Engrave the circuit diagram and labels, drill the terminal holes with the 2 mm end mill, then cut out the board.
- Free the parts at the holding tabs with a utility knife or fine saw and sand the tab remains flush.
- Before gluing, dry-fit everything. If a joint is too tight, increase the clearance by 0.05 mm and carve the part again; if it wobbles, reduce it.
Assembly and final touches
- Put a brass paper fastener into each terminal hole and bend it open at the back. Screw battery holder and lamp holders into place and wrap the wires around the fasteners; a paper clip between two fasteners serves as switch.
- Only work with 3 V from two AA cells, never with the mains socket. In the series circuit both lamps glow more dimly and go out together, in the parallel circuit they glow brightly and independently.
How to carve this template
- OpenOpen the template in the app and adjust size and text if you like.
- CheckLook at it in 3D, check run time and warnings.
- Set upThe carve wizard guides you through material, clamping, bit and zero point.
- CarvePress start; the app drives your Grbl router directly over USB.